10 Crucial Lessons from a DIY Camera Slider Build That Almost Worked
There's an irresistible charm to building your own gear—especially when the store-bought version empties your wallet. [TheHyperFix] faced that exact dilemma after spotting a brilliant camera slider. Rather than splurging, he opted to build one from scratch. What followed was a rollercoaster of blown components, jerky movements, and hard-won insights. His story offers a treasure trove of lessons for anyone tempted to roll their own. Below are ten takeaways from his journey.
1. The Temptation of DIY vs. Buying
The initial trigger is almost always cost. A high-end camera slider can easily cost hundreds of dollars, which makes the thought of building one from salvaged parts incredibly appealing. [TheHyperFix] saw a brilliant design and immediately wondered, “Can’t I just make that?” That question is the start of every DIY adventure—but it’s also the first place where expectations need to be checked. A commercial product is tested, tuned, and backed by a warranty. Your homebrew version? Not so much. The gap between “I can build this” and “I can build this well” is often wider than anticipated.

2. Repurposing Old Hardware Is a Double-Edged Sword
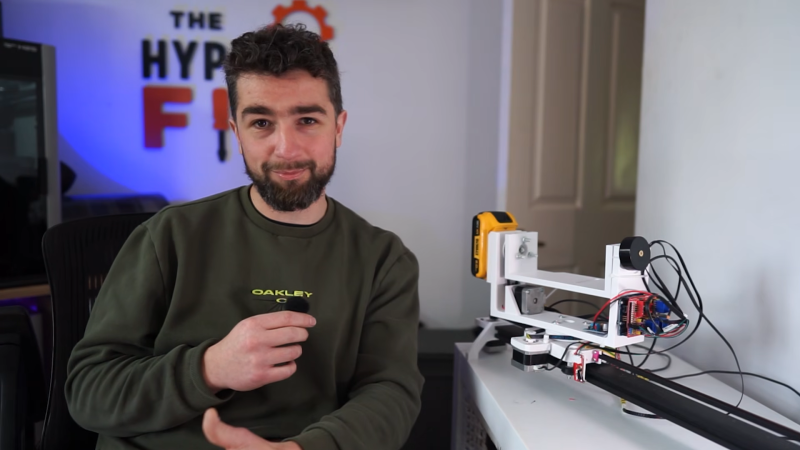
The plan seemed elegant: dismantle an old, broken 3D printer and harvest its linear motion parts. Aluminum extrusion, V-slot wheels, and a stepper-driven belt system—all destined for a new life as a camera slider. Salvaging components is eco-friendly and budget-friendly, but it also means inheriting unknown wear, compatibility issues, and undocumented quirks. A 3D printer’s motion system isn’t designed for the smooth, vibration‑free travel that video requires. Using it as a foundation introduces challenges that a purpose‑built slider would never have.
3. Power Electronics Are the First Point of Failure
Early tests went well until the original printer controller simply blew up under load. That’s a clear sign the electronics weren’t rated for the sustained torque or current draw of the camera slider application. Even if the parts look similar on a specification sheet, real‑world demands can exceed design limits. Overvoltage, undervoltage, or simple thermal runaway can fry a controller in seconds. The takeaway: always over‑spec your power electronics and include fuses or current limiting from the outset.
4. An Arduino + CNC Shield Is a Popular Fallback—But Not a Cure‑All
After the controller died, [TheHyperFix] substituted an Arduino Uno paired with a CNC shield. This combination is widely used in DIY motion control, and it got the slider moving again. However, the shield’s stepper drivers have limited microstepping resolution and pulse speeds, which directly affect smoothness. While an Arduino is flexible and well‑documented, it’s not a silver bullet. You still need to properly tune acceleration, jerk, and current limits for your specific mechanical load.
5. Jerky Movement Exposes Mechanical and Electrical Mismatches
Even with the new controller, the slider’s motion was far from cinematic. Jerky movement usually indicates resonance, insufficient torque, or improper microstepping. In this case, the combination of V‑slot wheels, belt tension, and the stepper driver’s pulse limitations created visible stuttering. A camera slider must glide like it’s on ice; any hesitation ruins the shot. Diagnosing the source of jerkiness requires systematic testing—changing speeds, loads, and motor parameters one at a time.
6. Bearings and Pulse Limits: The Iterative Grind
The build entered a tough iterative phase. Two recurring gremlins: bearing wobble and the Arduino’s pulse frequency ceiling. The V‑slot wheels introduced play that magnified as the camera platform moved along the rail. Meanwhile, the Arduino’s maximum step rate limited how fast the motor could accelerate, leading to missed steps and uneven travel. Neither problem had a quick fix. [TheHyperFix] had to redesign bearing mounts and explore alternative motor controllers—a process that ate up time and patience but ultimately taught him more than any smooth first try would have.
7. “Semi‑Functional” Is Still a Victory—But Not For Professional Use
After all the tweaks, the slider worked… kinda. It could move the camera along the rail, but the motion was not smooth enough for professional shooting. Many DIY projects end here: functional but flawed. It’s easy to see this as failure, but it’s more accurately a prototype. The slider served its purpose as a learning tool and may even be usable for casual shots or time‑lapses with post‑processing stabilization. Setting realistic expectations from the start prevents disappointment.
8. The Real Value Is in the Journey, Not the Destination
“A great deal was learned in the process,” [TheHyperFix] reflected. That sentiment is the heart of every ambitious DIY project. He now understands stepper motor control, belt drive tensioning, and the importance of mechanical rigidity—knowledge that applies to countless future projects. Even if the slider never films a Hollywood movie, the skills gained are infinitely reusable. Do‑it‑yourself isn’t always about the final product; sometimes it’s about the experience and the competence you build along the way.
9. Consider Starting With a Proven Design
The article suggests that if you need a camera slider in a hurry, it’s smarter to recreate one of the builds they’ve featured before. Many makers have shared complete, tested designs with BOMs, g‑code, and wiring diagrams. Starting from a known working platform sidesteps the worst pitfalls. You can still customize it later, but you avoid the “ground‑up” struggle that [TheHyperFix] faced. There’s no shame in standing on the shoulders of giant‑nerved makers.
10. Perseverance Pays Off – Even When the Build Isn’t Perfect
The final state of [TheHyperFix]’s slider isn’t perfect, but it’s “well on the way.” That’s enough to call the project a success. Many people abandon their builds at the first blown controller or stuck bearing. He kept iterating, swapping parts, and learning. That tenacity is the secret ingredient in any DIY undertaking. Next time he builds a slider—or any motion‑controlled device—he’ll be armed with hard‑won lessons. And maybe, just maybe, the next version will achieve that buttery‑smooth glide.
Conclusion
[TheHyperFix]’s camera slider journey is a microcosm of the maker experience: ambition meets reality, parts break, frustration mounts, yet wisdom grows. Whether you’re planning a similar build or just enjoy tinkering, these ten lessons can save you time, money, and hair‑pulling. The best tool in any workshop isn’t the 3D printer or the Arduino—it’s the willingness to try, fail, and try again.